Thank you so much for purchasing this design! This collection took me literally 2 full months to digitize. It is obviously quite intricate and so I wanted to give you as much insight as possible for how to use this design collection to its fullest capacity. Below I have written quilting recommendations, steps for stitching, as well as my color recommendations. I hope you love this collection as much as I loved creating it!
Quilting Recommendations
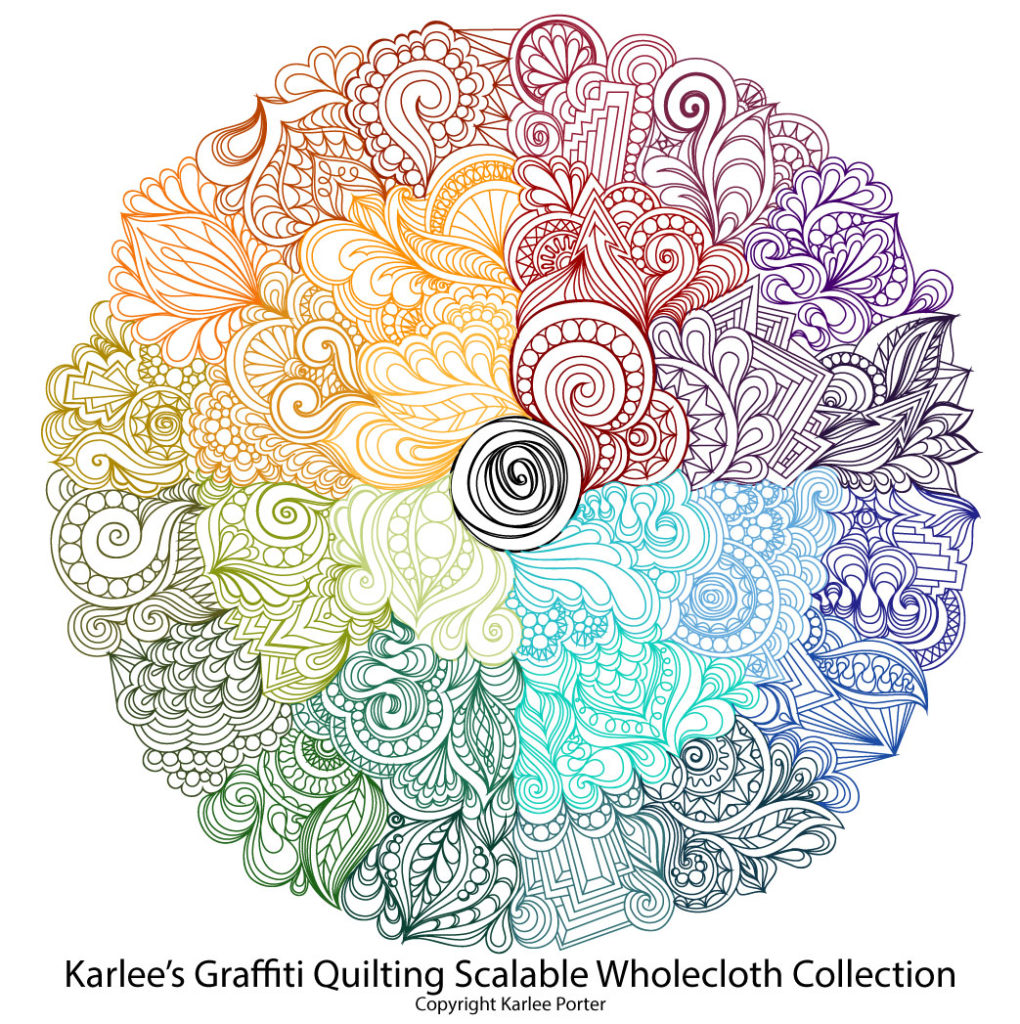
Karlee’s Graffiti Quilting Scaleable Wholecloth Collection is designs to stitch out in sections, allowing you to quilt it as small as 10” and as large as your quilting machine’s throat space will allow, per section. Below is a chart that will help you know approximately how large you can stitch the entire circle’s design based on the height of each section and the throat space of your particular machine. This measurement is done using the section of the design that has the most height (section #10) in comparison to the rest of the sections.
Use this chart to know what the maximum size of the design can be for your particular quilting machine.
| Your Machine’s Maximum Quilt-able Throat Space | Size of the overall design collection |
| 2.5 | 10 |
| 3.75 | 15 |
| 5 | 20 |
| 6.25 | 25 |
| 7.5 | 30 |
| 8.75 | 35 |
| 10 | 40 |
| 11.3 | 45 |
| 12.6 | 50 |
| 13.85 | 55 |
| 15.15 | 60 |
| 16.3 | 65 |
| 17.6 | 70 |
| 18.8 | 75 |
| 20 | 80 |
| 21.4 | 85 |
| 22.5 | 90 |
| 23.9 | 95 |
| 25.1 | 100 |
| 28.7 | 105 |
| 30.21 | 110 |
| 31.6 | 115 |
Steps for Stitching:
While every quilting machine software is going to vary a little bit, I wanted to share with you the steps that I took to stitch out this design on my machine at a size that required me to advance my fabric back and forth. My machine has approximately 20” of quilt-able throat space, but I wanted to be extra safe from hitting my poles so I stitched out the design at 70” square, meaning that each section would be no taller than about 18”. I would definitely recommend that the first time you stitch out this collection larger than your machine’s throat space that you do so on a test piece of fabric, just so you can fully understand the necessary steps to make sure things will line up accurately.
Now, one thing I feel obliged to mention is that even though this design is digitized basically perfectly, when you start advancing your fabric and dragging and dropping the design, it is also inevitable that you will have slight variances. However, even stitching this design at 70”, the variances that occurred simply from human error (every time I advanced the quilt, I had to undo and redo my side clamps which did not always have exactly uniform tension each time) were still less than .5” off. I was personally pretty happy with this accuracy. Once the quilt is finished, it really is very unnoticeable. And, if someone points this out to you after all your hard work, you’ll know who to “unfriend” from Facebook.
Here are the approximate steps that I took on my quilting machine to set up and quilt out this design:
1. Mark the very center of your quilt top fabric before loading it on the frame. I used a water soluble marker for this.
2. Load your quilt top and backing as normal. For my test I used a piece of white 72” wide solid cotton.
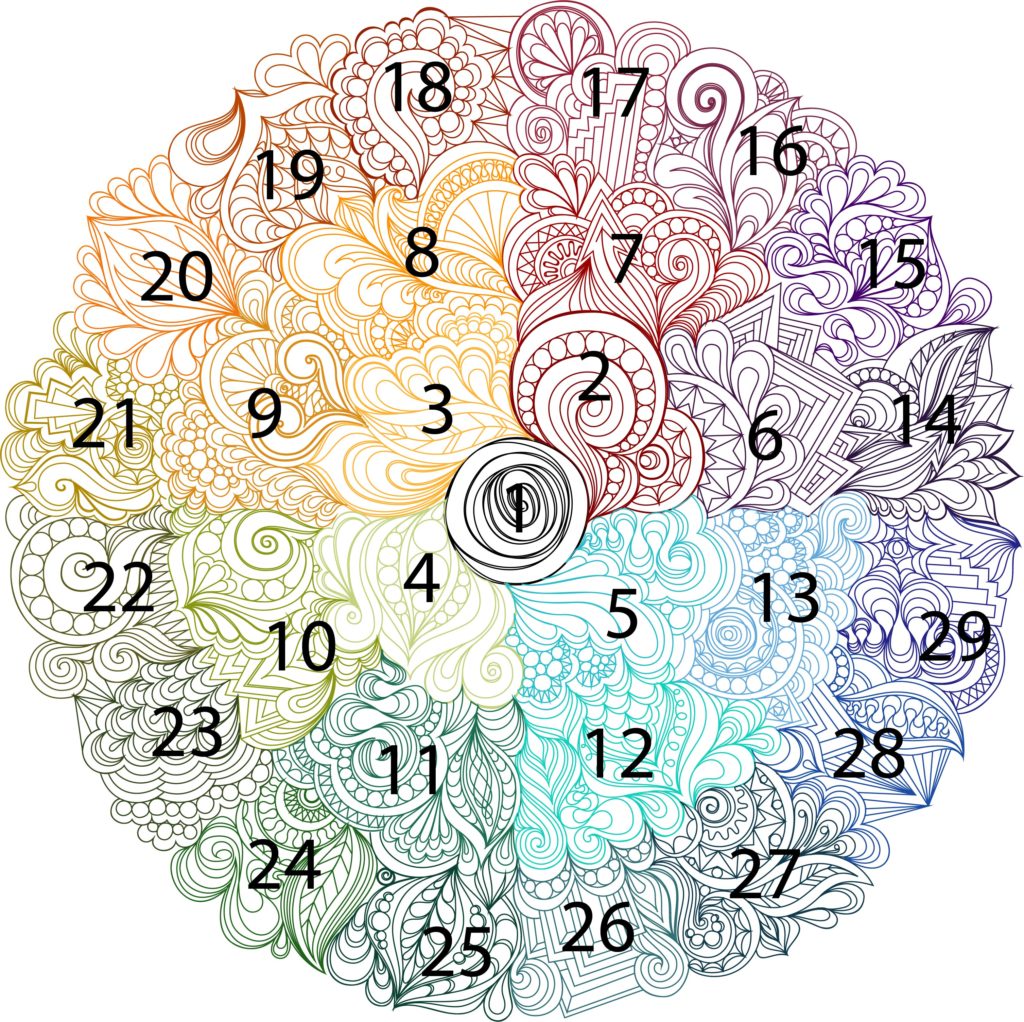
3. Open the entire circle design on your quilting machine. (It is best to keep the entire composition in tact, if possible, opposed to trying to place each of the 29 pieces individually.)
4. Resize the design to your desired finished size, keeping in mind how large you can go based on your machine’s throat space using the above table.
5. Baste down the top edge of your fabric to your batting and backing.
6. Advance your quilt until you see the center marking you made on your quilt before loading it onto the frame.
7. Reposition the entire design so that the very center of it is centered with your marking.
8. Set your machine to pause between jump stitches. I deliberately left a jump (albeit a small one) between each section so that your machine could also pause between each section.
9. Run your machine to stitch out the first section of the design. This is the center circle of the design. Use the diagram below to reference the order in which each section stitches out.
10. After the first section has completed stitching, move your machine to the lowest point of section 2, drop your needle into your fabric.
11. Reposition the design (my software calls it “Drag & Drop”) while advancing your fabric backwards (rolling your fabric towards the front poles).
12. When your needle (which is currently lowered into your fabric) is close to touching the front pole, tighten the tension on the bars and replace your side clamps.
13. Set the new position in your software so that when you raise your needle and move your machine, that design will stay put on the screen.
14. The entire design should now be in position with your fabric and you should have enough space within your machine’s throat space to stitch out section 2.
15. When section 2 is stitched out and the machine pauses before the next jump, you will repeat steps 11 through 14 for each section of the collection.
HINT– After repositioning the design between each section, its helpful to move your machine around that section of the design and make sure that you can go around the perimeter of the section without hitting your poles. This is simply a “measure twice stitch once” method to double check that your repositioning is accurate between each section.
Color Recommendations
I personally really like to use Sulky 40 Wt. Rayon for this particular design. If you do too, I would really love it if you would use my affiliate link to pick up some new colors. It doesn’t cost you any more than the thread normally would, but I get a little kick back of each sale which is kinda cool. 🙂
Here is my affiliate link: https://shareasale.com/r.cfm?b=1158104&u=1758484&m=63058&urllink=&afftrack=
Here is a list of recommended colors that you can use, in the following order:
1. 1005 Black
2. 1312 Wine
3. 562 Spice
4. 1100 Light Green Grass
5. 1094 Medium Turquoise
6. 1299 Purple Shadow
7. 1169 Bayberry Red
8. 1065 Orange Yellow
9. 1126 Tan
10. 1177 Avocado
11. 640 Medium Aqua
12. 1095 Turquoise
13. 1249 Cornflower Blue
14. 1199 Admiral Navy Blue
15. 1112 Royal Purple
16. 1309 Magenta
17. 1311 Mulberry
18. 1217 Chestnut
19. 1158 Dark Maple
20. 1168 True Orange
21. 1227 Gold Green
22. 1173 Medium Army Green
23. 525 English Green
24. 1051 Xmas Green
25. 1230 Dark Teal
26. 1251 Bight Turquoise
27. 1162 Deep Teal
28. 1253 Dark Sapphire
29. 1535 Team Blue